HubSpot’s Buyer Intent tool is new and now here to answer two of the biggest questions that plague sales and marketing teams everywhere.
Sales asks: “I need prospects, so how do I find the best (and warmest) place to start?”
Marketing asks: “I’m sure our marketing campaign is targeting the right buyers, but how do I prove it’s getting us the right kind of traffic?”
Figuring out which companies are genuinely interested in your products or services can feel like a guessing game, and you end up with more suspects than prospects. You’re pouring resources into marketing campaigns, hoping they resonate with the right audience.
Hope springs eternal… but it isn’t a strategy. Fortunately, HubSpot’s new Buyer Intent tool helps pull back the curtain a bit to show you how many hits, from how many people, at which companies your website is attracting. It’s a great tool to show that your marketing is getting the right attention, and it’s a great place for the sales team to start prospecting with warm companies showing signals that they’re in the market for your solution.
Before you get to all that goodness, you need to set the tool up correctly. We’ll walk you through the setup here and suggest a list of ways to put that data to work for your team. After all, data without action is just noise.
HubSpot Buyer Intent Setup: What You Need Before You Start
Before you dive into setting up your buyer intent tool, there’s a little groundwork to get out of the way.
First, the HubSpot tracking code is your non-negotiable starting point. This snippet of code, embedded on your website, is the engine that collects crucial website activity data. It’s how HubSpot recognizes which companies (and contacts, once they’re known to your CRM) are visiting your site and what they’re looking at.
If you haven’t already installed it, head over to HubSpot’s knowledge base for a step-by-step guide (we’ll wait).
Now, let’s talk about access. Ensuring the right people on your marketing teams have the necessary permissions to use the Buyer Intent Tool is crucial. This prevents any accidental misconfigurations and ensures everyone’s on the same page. To configure the buyer intent tool, you need Buyer Intent permissions. If these permissions are toggled off, the configuration options will be greyed out, and you’ll need to get one of your Super Admins to give you access.
All members of the team should have at least View/Read access to this tool
Next up, pull together all the information you have about your persona and ICP. Think company size, industry, location, job title, pain points – all the characteristics of your ideal customer profile (ICP). Remember, the more precise you are here, the more relevant the intent data you’ll receive. This focus allows you to target a specific, high-potential segment of your Total Addressable Market (TAM). You’ll also want to have access to your website’s Google Search Console instance while setting this tool up.
B2B vs. B2C Utility of the Buyer Intent Tool
Quick note: if you’re one of our friends in B2C or DTC businesses, this tool isn’t going to be very helpful to you.
HubSpot’s Buyer Intent tool relies on identifying companies based on IP addresses, which are readily available for businesses via public data. In the B2C world, where individual consumers use various networks and devices, pinpointing specific individuals based on website visits becomes significantly more challenging — and HubSpot simply doesn’t do it.
The Buyer Intent tool reveals company data about the people visiting your website. It does not reveal person/contact-level data, and as of August 2025, it will not create net new contacts for your system.
For B2B businesses, particularly those targeting larger companies with static IP addresses, the tool still offers a wealth of actionable intelligence. It’s especially useful for companies dealing with long sales cycles and complex buying processes, common in the B2B landscape.
For example, a B2B manufacturing company selling enterprise equipment can use the tool to identify businesses that are researching new solutions, specific industry challenges, or even their competitors.
TL;DR – Just Show Me How
Okay, we get it. You’re a visual learner. Here’s a video that walks you through how to set up the Buyer Intent Tool in HubSpot:
00:00: This tutorial guides you through setting up HubSpot’s Buyer Intent Tool to identify and target potential customers who visit your website but may not convert on a form.
00:10: You will learn how to configure settings for Target, markets intent, criteria and automation settings to optimize your buyer and Ted tracking.
00:18: Before you get started, it’s important to make sure that the HubSpot tracking code is installed on all pages of your website.
00:25: Complete that step first.
00:26: Click the Buyer Intent tool in the Marketing Hub menu to begin.
00:31: Click configuration to access the settings for managing buyer intent, markets, and criteria.
00:38: Click manage markets to view and edit your existing buyer intent markets.
00:43: Click create new market to start defining a new target market for buyer intent tracking.
00:50: Here, you’ll use your Ideal Customer Profile to specify what kind of companies, of what size, and with how much revenue are important targets for your team.
00:59: Enter your Market named identify this target Market within HubSpot.
01:04: Choose the industry or industries your ideal customers are in
01:08: Specify your industry targets more clearly by including keywords that best define the kinds of companies you do business with.
01:16: Adding an employee range can help you target businesses of the right size.
01:21: Click United States to Target companies located within this country.
01:26: You can enter a state or province name, and even a city name, if you want to narrow your geographic are for this market even more.
01:33: Phil in keywords related to web Technologies to exclude or include specific Tech usage.
01:39: Click Add web technologies to exclude to manage the technologies you want to exclude from your market.
01:46: Click the revenue range to specify the annual revenue for companies in your Market.
01:51: Review, the market name, Industries, company, size, location, and revenue, filters for accuracy.
01:59: Click create Market to save your new market, configuration and apply the settings.
02:04: Click “Add intent criteria” to define the behaviors users perform on your website that indicate buyer intent within your market.
02:12: Click criteria name to enter a name for your buyer intent, criteria.
02:18: A good middle of funnel. Intense signal is the viewing of a pricing page on your website.
02:23: For this example, we’ll set this intent first provide the system, your pricing page URL in the page path section.
02:30: Click minimum number of visitors to set the threshold for intent detection.
02:35: For this example, we’ll gather any pricing page views within the last 30 days.
02:41: Click save to store your buyer in Ted criteria and apply it to your Market.
02:46: You can add up to 10 high value page views, or actions.
02:50: Consider reviewing the contact records for your best clients to see what pages they visited before they converted into leads.
02:58: What do companies tend to search for before coming to your website? What keywords define your offerings? You can find companies searching for your solutions by monitoring the research intent around those tools. The research intent tool is powered by HubSpot’s proprietary intent ecosystem of over 200,000 websites. Every
03:16: website in the ecosystem has the HubSpot tracking code installed and has opted into intent data access. All
03:23: data is anonymized – you’ll be able to see companies, but not people.
03:29: Click edit research, in Ted topics to modify the list of topics tracked for intent.
03:35: Click search topics to find specific keywords, or topics to add, to your research.
03:41: Click Company URL to specify the domain associated with your company.
03:46: The tool will suggest keywords to watch based on your website.
03:50: With your market and intent topics now set, let’s create a saved view that shows just the companies that fit these parameters.
03:58: Click saved views to access previously, saved buyer intent, filters and configurations.
04:05: Click filters to adjust the criteria used to segment buyer intent data.
04:10: Set the time frame for this view, toggle ON the visitor intent setting.
04:15: If you only want to see traffic from a certain source, like paid search or organic social media, you can define that here, too.
04:23: you can narrow this by country, and if you have multiple websites connected to your HubSpot environment, you can specify, which website views you care about here,
04:32: You can also limit this to specific website Pages if you want this view to show only the visits to a special page like your pricing page for example.
04:41: Click Target markets to specify, which markets to include in your buyer intent analysis.
04:48: Click ON to activate the target markets filter for buyer intent data.
04:53: If you have a HubSpot Segment, also known as a list, of companies you would like to limit this view to center on, you can enter the name of that segment here.
05:02: You can also use segments to exclude a list of companies, if there are companies you don’t want to see here
05:08: Click CRM to access customer relationship management, settings related to buyer intent.
05:15: You can choose whether you want this view to include all companies, only companies in your CRM, or only companies who are not yet in your CRM.
05:24: Click save View and automate to store your buyer, intent View and enable automation rules.
05:30: Click name this view to provide a descriptive name for your saved. Buyer intent. Configuration
05:37: Click automations to configure automatic actions. Triggered by buyer intent signals.
05:42: You can have the system automatically add new companies to your CRM with these settings.
05:47: These automations use 10 credits each. You can set limits on credit usage in a future step!
05:54: Save your settings before moving on to the next step.
05:58: Head back to the Configuration tab
06:01: Scroll down to the Buyer Intent Credit Limits section. Set a limit on how many credits this tool is allowed to automatically consume.
06:09: This will be different for everyone and depends on how many credits you’re using for other enrichment activities.
06:15: Now that you’ve configured the tool and created a view that brings important companies to the forefront, it’s time to make sure that the right people see this information on a regular basis. HubSpot will email the users you specify a copy of this view on the cadence of your choosing.
06:31: Select the saved view, you want to have emailed out, then in the frequency section Define, how often you want this email to go out?
06:39: In the recipients field, specify the HubSpot users who should receive this. Email digest. Recipients must be HubSpot users, but they can be view only users if needed. Click create email digest to save this step.
06:53: You have successfully set up HubSpot’s Buyer Intent Tool by configuring target markets, defining intent criteria, and enabling automation. This
07:02: setup allows you to track buyer signals to help your sales and marketing teams reach more interested, warmer prospects at companies who are searching for your solutions.
Ready for step-by-step instructions and a deep dive into the details? Keep reading.
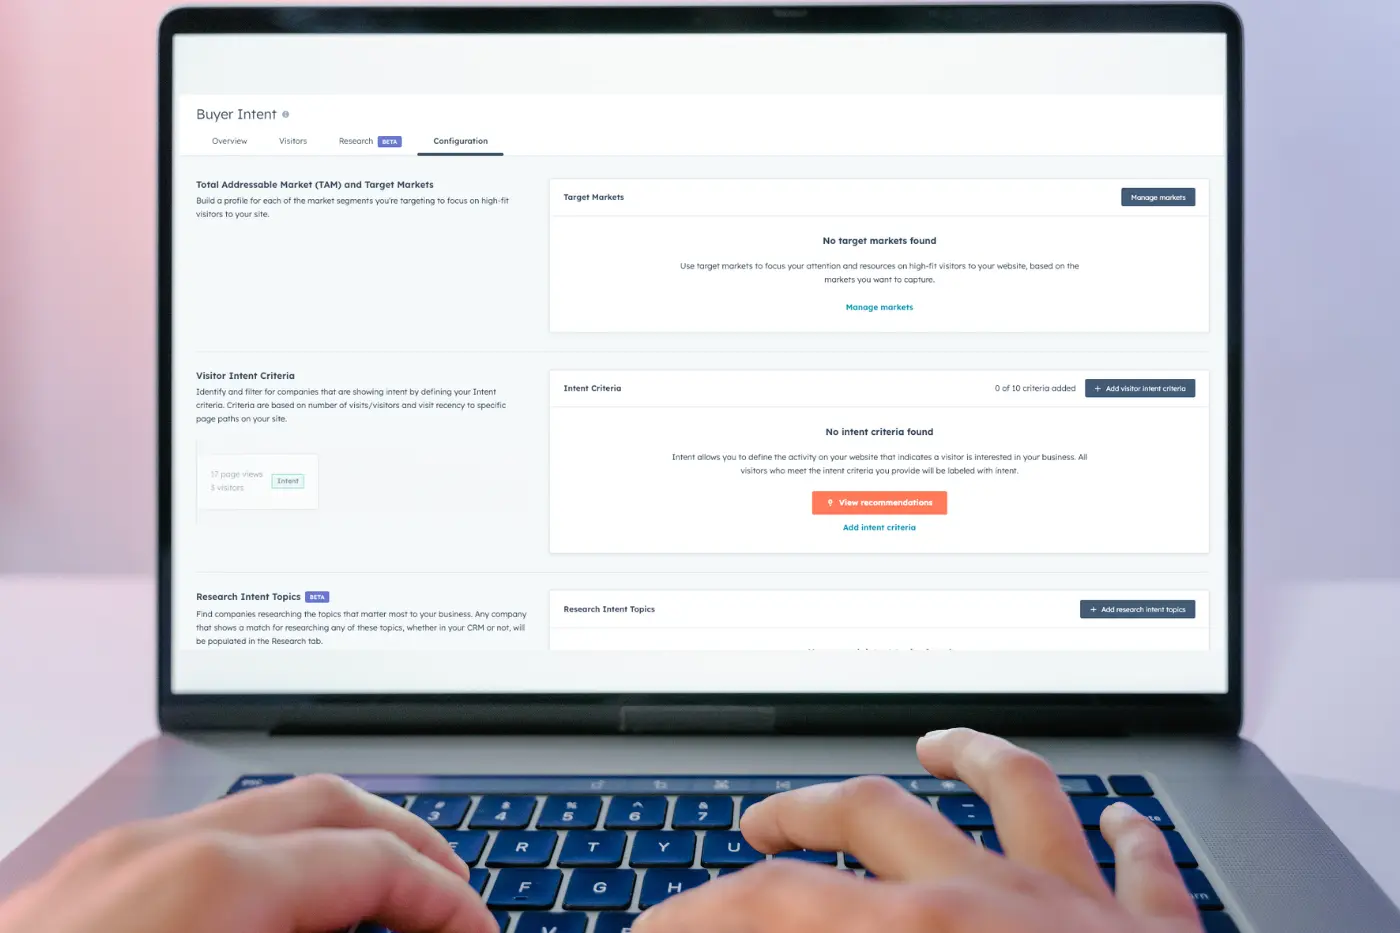
Set up Your Target Markets For the Buyer Intent Tool
Remember the persona and ICP information you pulled together earlier? This is where that data comes into play.
Within the Buyer Intent Tool, you can specify the characteristics of the companies you want to track. Are you focused on enterprise-level clients (large company size) or small to medium-sized businesses? Which industries are your sweet spot? Be as granular as possible here. This precision ensures you’re not wasting time sifting through irrelevant data.
Think about your existing customer base – what common traits do they share? This information can help refine your target market definitions within the tool, leading to more qualified lead generation. For instance, if your best customers are typically SaaS companies with 50-200 employees located in the US, use these parameters in your target market setup. Analyze your CRM data to identify common characteristics and prioritize those exhibiting higher conversion rates or lifetime value. Testing variations of your target market definitions can further optimize your intent data capture, too.
Ready? Here’s the step-by-step knowledge base article from our pals at HubSpot. See you when you’re done.
Set up Intent Criteria in the Buyer Intent Tool
Perfect. You have your Target Markets figured out. Now, we’ll configure the Buyer Intent tool to signal you and your team when someone in that target market hits your website.
Take some time to think about what “intent” actually means for your business. This is where you define the specific actions people take on your website that signal genuine interest in your products or solutions.
Are certain website pages more indicative of a buying mindset than others? For example, multiple visits to your pricing page or a case study download could be strong intent signals. Maybe it’s a combination of factors, like repeat visits coupled with extended time spent on specific product pages.
This isn’t a one-size-fits-all approach; the optimal intent criteria will vary depending on your business, your sales cycle, and how your website is set up.A sales-ready website can help you zero in on which actions signify buying intent.
Experiment and refine your criteria over time, based on observed website activity and conversion rates. Consider tracking form submissions, engagement with specific content offers, and interactions with chatbots as potential intent signals. A/B test different combinations of criteria to determine which yields the highest quality leads. For example, a high-value action like requesting a demo should carry more weight than simply downloading a whitepaper.
This is something you’ll likely tweak over time, so make your best assessment and get started — you can change this up later.
Check out the step-by-step instructions for setting this bit up here: HubSpot – Configure Buyer Intent Criteria.
Set up Your Research Intent Topics in the Buyer Intent Tool
Alright, so we’ve got your target markets defined, and we’ve decided what individual actions signify buying intent. There’s one more thing to configure!
Beyond simply tracking website visits, the Buyer Intent Tool allows you to delve deeper into research intent topics.
This feature uses HubSpot’s Breeze Intelligence to identify companies that are likely researching topics relevant to your offerings, even if they haven’t yet visited your website.
For instance, if you’re selling surgical PPE for hospitals, you might track topics like “better PPE for surgery” or “surgical PPE.”
This proactive approach helps you start the prospecting process sooner than ever. Uncovering potential leads early in their buying journey gives you a head start in the sales process. B2B buyers conduct an average of 12 online searches before visiting a brand’s website [6], so capturing their interest at this research phase can be a great way to position your brand as a helpful authority in the industry.
So, how do you know what terms to add to your Research Intent bucket? You have some options:
- Use your company’s messaging matrix to set up research intent triggered from your differentiators. If someone’s looking for the things you do better than the competition, this gives your sales team a natural opening to start a conversation.
- Use Google Search Console to see what keyword searches are already sending traffic to your website.
- Use a keyword research tool like Ahrefs or Semrush to identify the relevant topics and long-tail keywords your target audience is searching for. Keywords with a good search volume are important here.
You can also monitor industry forums and online communities to understand the challenges and discussions relevant to your target audience and incorporate them into your research intent topics.
Ready for the step-by-step? Head over to the HubSpot Knowledge Base now.
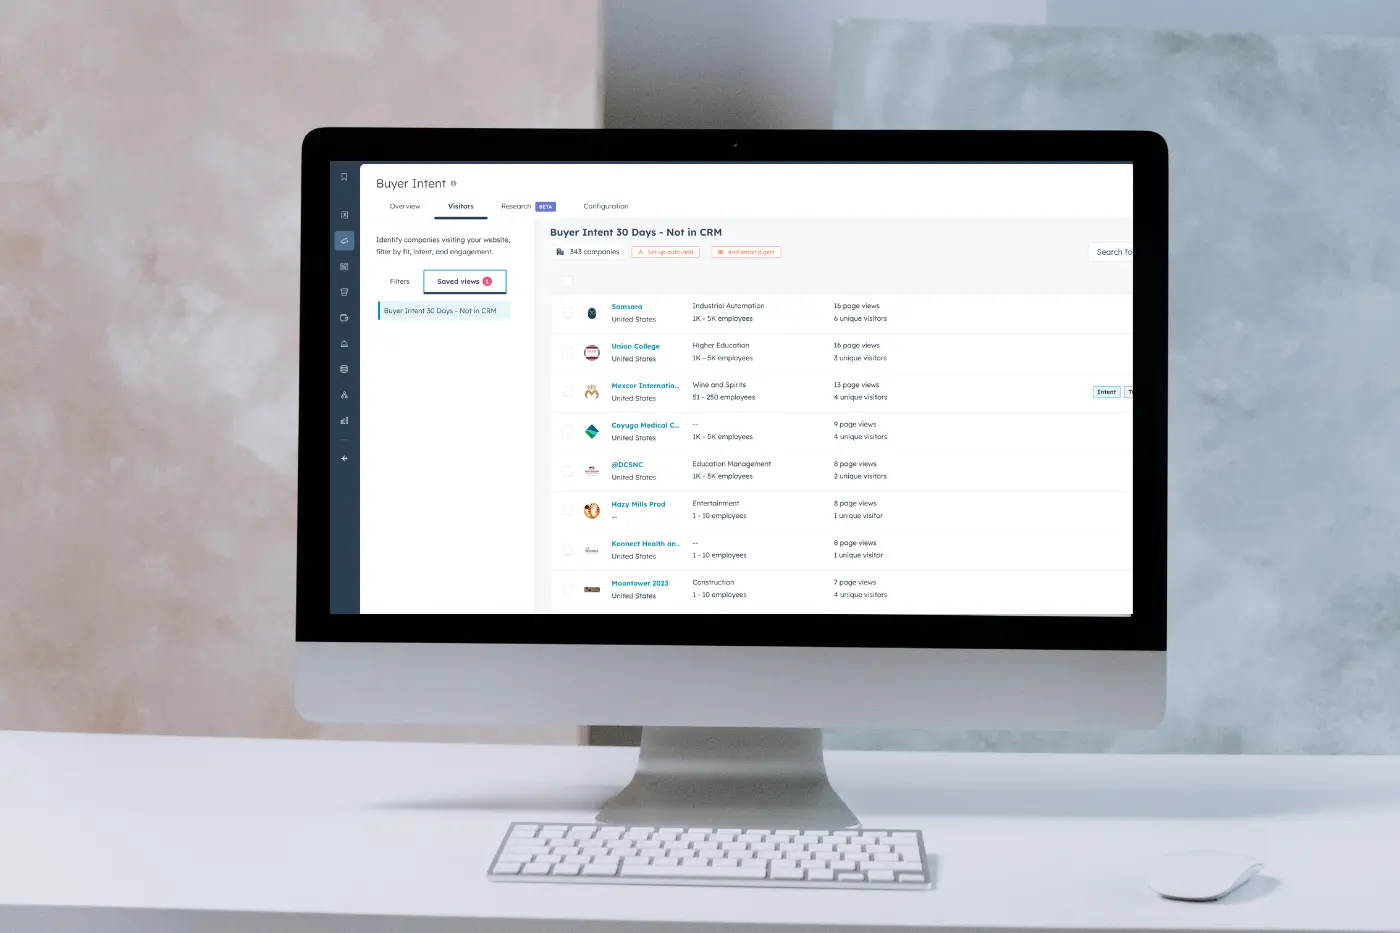
Set up Your Buyer Intent Saved Views for Faster Access
With the setup done, you’ll see a lot of valuable intent data start flowing in. You’ll also see some data that isn’t particularly interesting, so now it’s time to filter that out.
The HubSpot Buyer Intent Tool allows you to create saved views, which are essentially custom dashboards tailored to specific needs for sales or marketing teams.
Your sales team could benefit from a view focused on companies researching specific intent criteria or companies within a particular target market. You can create saved views for different sales territories, product lines, or customer segments. A sales team focused on enterprise clients could have a saved view displaying companies with over 1000 employees researching enterprise software solutions.
Marketing teams can create saved views to monitor specific campaign performance related to intent signals. For example, your marketing team can prove the efficacy of their newest campaign by creating a view showing target market companies that have visited the campaign landing pages since launch.
Saved views streamline your workflow, allowing you to quickly access the most relevant intent data without having to reconfigure your filters every time. These saved, shared views are great for aligning sales and marketing, as both teams can access consistent, real-time data.
More about creating and accessing your Saved Views over on the HubSpot Knowledge Base.
Create Email Digests to Keep Your Team Informed
Great! You’ve got data coming in, and you’re using views to filter it down to the relevant, actionable items your unique teams care about.
Here’s the thing about your intent data views, though: it doesn’t work if no one views it.
Keeping your teams updated on your buyer intent insights doesn’t have to be another manual to-do. Instead, set up automated email digests to deliver the information directly to their inboxes! This helps everyone on your team get into a regular cadence of using the tool.
These digests can summarize newly identified companies showing high intent, highlight trending research topics, and even provide personalized recommendations for outreach. This is particularly valuable for sales teams, who can use these real-time alerts to prioritize prospect outreach and personalize sales conversations based on current buyer intent.
This approach allows sales reps to go into cold outreach just a little bit warmer and focus on companies already showing interest.
You should customize email digests based on specific team roles and responsibilities. Sales reps can receive alerts about companies exhibiting buying signals related to their assigned territories or product lines. Marketing teams can receive digests summarizing overall intent trends and campaign performance related to intent data.
Get the click-by-click instructions from the HubSpot team here!
HubSpot Configuration Can Be a Lot. Need Some Help?
Even with a great knowledge base, configuring individual HubSpot tools, user access, tasks, and digests can be challenging. It’s time-consuming, for one. And HubSpot tools change and update regularly, which might mean you need to correct your configuration to meet these updates.
If you’ve tried your hand at DIY HubSpot implementation before and want to make sure your data is in good shape before you dive into the wild world of buyer intent, try our HubSpot audit!
Ready to move on to the next part of using this tool? Read this article to learn how to use your Buyer Intent tool to connect with real people, not just company data!